laravel入門 2 (下載安裝、MVC流程編寫、資料庫設定)
上一章節我們已經介紹過laravel的一些基本的架構 , 今天就來開始動動手來操作laravel了~
1.下載Laravel
Laravel 使用了 Composer 來管理套件的相依性。所以,在使用 Laravel 之前,確保你已經在你的機器上安裝了 Composer。
安裝Composer
安裝網址 : https://getcomposer.org/download/
windows環境只要點選紅框處兩下就可以直接下載了
下載laravel
用 windows 打開 命令提示字元(CMD) , 如果覺得內建的不好用的話可以下載 Cmder
命令提示字元(CMD)記得先進入想下載的位子
再輸入下方指令 , 就可以開始下載了
composer create-project --prefer-dist laravel/laravel blog
說明 : blog為laravel的目錄名稱 , 可以自訂
執行完後 , 到指定的位子應該就可以看到完整的laravel檔案了~
2.使用Laravel來製作個範例
接著我們來用Laravel製作一個有新增、修改、刪除的筆記本的範例 ~
我們會使用到bootstrap的套件 , 我們這邊是使用cdn的方式 ,
但也可以使用官方的下載方式
cd /path/of/your/project
composer require laravel/ui --dev
php artisan ui bootstrap
php artisan ui bootstrap --auth
npm install
npm run dev
製作一個筆記本的頁面
route設定
找到routes/Web.php , 更改下列程式碼
// 註解初始程式碼
// Route::get('/', function () {
//     return view('welcome');
// });

//重新設定首頁的路徑到 NoteController控制器
Route::get('/','NoteController@home');
補充 如果是laravel 8 以上的話 route已經改寫成下方這種形式 :
use App\Http\Controllers\NoteController;

Route::get('/', [NoteController::class, 'home']);
controller設定
使用 php artisan 新增 NoteController控制器(命名規則 使用大駝峰命名法)
php artisan make:controller NoteController就會產生 app\Http\Controllers\NoteController.php檔案
找到後 , 增加 home 函式 , 如下
<?php

namespace App\Http\Controllers;

use Illuminate\Http\Request;

class NoteController extends Controller
{
    public function home(Request $request)
    {
        //導向home.blade.php
    	return view('home');
    }
}
view設定
找到 resources\views 新增一個檔案 , 檔名為 home.blade.php
這邊我們先製作一個畫面 , 先用假的資料填寫 , 功能我們再一步一步的補齊
<!doctype html> <html lang="en"> <head> <!-- Required meta tags --> <meta charset="utf-8"> <meta name="viewport" content="width=device-width, initial-scale=1, shrink-to-fit=no"> <!-- Bootstrap CSS --> <link rel="stylesheet" href="https://stackpath.bootstrapcdn.com/bootstrap/4.2.1/css/bootstrap.min.css" integrity="sha384-GJzZqFGwb1QTTN6wy59ffF1BuGJpLSa9DkKMp0DgiMDm4iYMj70gZWKYbI706tWS" crossorigin="anonymous"> <!-- 引入google字體 --> <link href="https://fonts.googleapis.com/css?family=Lato:300,300i,400,400i,700,700i,900&subset=latin-ext" rel="stylesheet"> <style type="text/css"> body{ font-family: '微軟正黑體', 'Noto Sans TC', Helvetica, Arial, '黑體-繁', 'Heiti TC', '儷黑', 'LiHei', 'Microsoft JhengHei', sans-serif; } </style> <title>Note</title> </head> <body> <div class="container"> <div class="row"> <div class="col-12"> <h1 class="text-center mt-2">Note</h1> <input type="text" class="form-control mt-5" placeholder="標題"> <textarea class="form-control mt-2" placeholder="內容" rows="3"></textarea> </div> <div class="col-12 text-right mt-2"> <button type="button" class="btn btn-primary">新增</button> </div> <div class="col-12 mt-5"> <table class="table"> <thead class="thead-light"> <tr> <th width="200">標題</th> <th width="600">內容</th> <th>時間</th> <th style="min-width: 150px;">操作</th> </tr> </thead> <tbody> <tr> <td>Mark</td> <td>Otto</td> <th>2019-08-01 01:00:00</th> <td> <button type="button" class="btn btn-secondary" data-toggle="modal" data-target="#exampleModal">編輯</button> <button type="button" class="btn btn-danger">刪除</button> </td> </tr> <tr> <td>Jacob</td> <td>Thornton</td> <th>2019-08-01 01:00:00</th> <td> <button type="button" class="btn btn-secondary">編輯</button> <button type="button" class="btn btn-danger">刪除</button> </td> </tr> <tr> <td>Larry</td> <td>the Bird</td> <th>2019-08-01 01:00:00</th> <td> <button type="button" class="btn btn-secondary">編輯</button> <button type="button" class="btn btn-danger">刪除</button> </td> </tr> </tbody> </table> </div> </div> </div> <!-- 編輯視窗 --> <div class="modal fade" id="exampleModal" tabindex="-1" role="dialog" aria-labelledby="exampleModalLabel" aria-hidden="true"> <div class="modal-dialog" role="document"> <div class="modal-content"> <div class="modal-header"> <h5 class="modal-title" id="exampleModalLabel"><b>編輯</b></h5> <button type="button" class="close" data-dismiss="modal" aria-label="Close"> <span aria-hidden="true">×</span> </button> </div> <div class="modal-body"> <div class="form-group"> <label class="col-form-label">標題:</label> <input type="text" class="form-control"> </div> <div class="form-group"> <label class="col-form-label">內容:</label> <textarea class="form-control"></textarea> </div> </div> <div class="modal-footer"> <button type="button" class="btn btn-secondary" data-dismiss="modal">關閉</button> <button type="button" class="btn btn-primary">送出</button> </div> </div> </div> </div> <!-- Optional JavaScript --> <!-- jQuery first, then Popper.js, then Bootstrap JS --> <script src="https://code.jquery.com/jquery-3.3.1.slim.min.js" integrity="sha384-q8i/X+965DzO0rT7abK41JStQIAqVgRVzpbzo5smXKp4YfRvH+8abtTE1Pi6jizo" crossorigin="anonymous"></script> <script src="https://cdnjs.cloudflare.com/ajax/libs/popper.js/1.14.6/umd/popper.min.js" integrity="sha384-wHAiFfRlMFy6i5SRaxvfOCifBUQy1xHdJ/yoi7FRNXMRBu5WHdZYu1hA6ZOblgut" crossorigin="anonymous"></script> <script src="https://stackpath.bootstrapcdn.com/bootstrap/4.2.1/js/bootstrap.min.js" integrity="sha384-B0UglyR+jN6CkvvICOB2joaf5I4l3gm9GU6Hc1og6Ls7i6U/mkkaduKaBhlAXv9k" crossorigin="anonymous"></script> </body> </html>
接著打開網頁 網址打上 http://127.0.0.1:8000 , 就會看到更改的畫面了~
與資料庫連線設定
設定 .env檔案
請依照自己的DB填寫資料
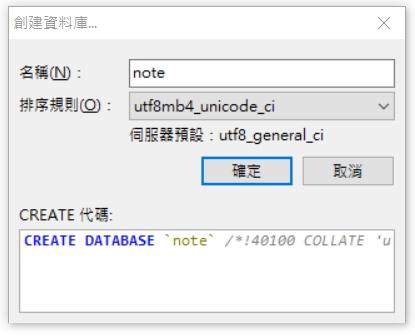
先在自己的環境新增一個名為 note 的資料庫
開啟CMD進入Laravel資料夾後, 輸入指令產生 model 和 migration
下方指令是新增 model , 但是後面增加 -m 就會同時在幫你建立 migrate
php artisan make:model Item -m
將會同時產生兩個檔案說明如下 :
model 的功能是操作資料庫 , 檔案位子 app/Item.php
migration 的功能是將所有對DB表格操作的動作,都撰寫成程式碼,透過執⾏程式來進行變更 ,檔案位子 database/migrations/時間_create_items_tabel.php
一般的情況下一個資料庫的資料表 就是配一個 model 和 一個migration
規劃資料庫 , 撰寫migration
migration的檔案位子 database/migrations/時間_create_items_tabel.php
    public function up()
    {
        Schema::create('items', function (Blueprint $table) {
            //流水號
            $table->id();
            //標題
            $table->string('title');
            //內容
            $table->text('content');
            //同時產生 創造時間與更新時間
            $table->timestamps();
        });
    }
完成後 , 使用CMD , 執行下方指令
php artisan migrate
有可能會出現下方錯誤 :
請在app/Providers/AppServiceProvider.php 的 boot函式 加上下方程式碼後再執行一次
    /**
     * Bootstrap any application services.
     *
     * @return void
     */
    public function boot()
    {
        \Schema::defaultStringLength(191);
    }
成功畫面如下 :
其他的都是內建的可以自行刪除 , 在看到資料庫 , 就可以發現增加items這個資料表~
特別注意 Laravel會自動幫你加上 s 唷 ~
補充 : 如果想退回的話 , 可以打下方指令
php artisan migrate:reset
今天先討論到資料庫的設定 ~
那我們下一節開始討論如何使用直接從畫面控制資料庫 ~
我們下張見嚕 👋👋👋


留言
張貼留言